Saturday, December 10, 2011

Hardware and Puzzles

More progress on the plane this week.  I am grateful I can walk from my house to the shop where the airplane is and jump back into projects.  This week was full of figuring out what goes where from the various piles of parts and boxes around the shop.  The good news is, there are less parts laying around and the airplane is a step closer to completed.  Only the major structural parts of the Stinson have the hardware specified in the parts manual--it's up to the builder to know what to use where for everything else.  I got new elevator cables from Univair this week and installed them.  There are a pair of fairleads that the elevator cables pass through on their way aft to the elevator horn


However, I wasn't sure if the up elevator cable went in the upper fairlead or visa versa.  I pulled them back taught trying to figure out the correct routing and visualizing how they should work pulling on the cables near the tail while the control column up front went back and forth.  I don't know why it was so hard for me to figure this out, but after 15 minutes of sawing back and forth I think I satisfied myself that the elevator cables are rigged properly.

I also put in the ELT unit.  Hope I never have to use this piece of equipment--it I did...well, you'd know where to find me.

I moved onto the door frames and rear cabin window frames.  When I first fitted the door frames back onto the steel fuselage, there was a 1/4" gap running down the backside of the cabin door and the aluminum door frame.  I thought this can't be right to squeeze these together with a screw so I went to the parts piles and found wooden shims that had holes in them that lined up perfectly with the holes in the door frames and they were labelled (thanks Mike) "L" and "R".

Once the door frames were screwed in, I also put in the assist handles on the front of the frame for when we will need to do installation in the cabin.  I was able to find some used truss head screws in the assorted bottles and coffee cans that fit the door frame holes and then matched them with new truss head screws that I had acquired with the plane.  In addition, I attached the rear cabin window frames which I was happy to do since there was this particular bracket that always hit my head when I stuck it inside the side of the cabin before.  Now the bracket is attached to the window frame.


I installed the side stringers and just temporarily dropped in the cotter pins that hold them in.  These stringers will have the fabric for the skin of the airplane fitted over them.


There were more parts for the front belly and sides underneath the cabin doors that I got out and cleaned off the dust.  This is where I had to stop because I wasn't sure how these were attached so I posted a question on a Stinson web group and also asked another Stinson builder and found that most of these are attached with rivets and some safety wire.  I'm working on purchasing or borrowing a rivet gun (I already have a large assortment of aviation rivets that came with the project).  The next posting will surely be riveting!  Lastly, here's a photo of the proper attire which I aspire to use this airplane for when it's completed.  It just arrived in the mail.

Sunday, November 27, 2011

Rudder Pulleys

Thanksgiving weekend provided several work sessions in the hangar.  I got the pulley modification kit from Univair (AD) to mod the front pulleys and brackets

Following the AD directions I had to cut the existing front pulley bracket and bend the ends straight.  However, I found that the bent tabs needed to be filed shorter because the new pulley cable guide holes did not line up with the existing bolt holes in the bracket.

Fitting the whole assembly together also produced another problem; the weld fillets on one side of each bracket were preventing the pulley from spinning freely when installed.  I had to put the bracket and pulleys on and off as I filled a small amount of the weld fillet to allow the pulley to rotate.


I'll have to go back and touch up these filed areas with primer, but for now, the pulley rotates freely and works well.  I went ahead and hooked up the rudder cables not knowing exactly their route and installed the rest of the rudder pulleys aft.  Studying the parts manual and other docs I found the correct rudder cable routing and finished it off by temporarily installing the rudder to get some degree of tension on the rudder cable system.


With the rudder cables installed I noticed the cables rubbing on two areas of the frame.  There are holes located on each side of the cable which indicated there must have been a friction material to prevent the frame being sawed into by the cables.  I looked at the disassembly photos for evidence of what these are but didn't find them so I commenced a search for possible parts in my assorted parts boxes and found the former parts which are a phenolic-type material.  I thought to buy new, but found they were in good shape and could be remounted by turning them around to an unworn spot.  I believe these are mounted with screws, probably drive screws which I found I had the correct size so I installed one to see how it looked.


Keeping with the rudder theme, I moved onto installing the rudder cable bungee system my cousin had already purchased for the rebuild.  I had the installation kit and blueprints which I consulted as I installed the system.  I had to drill new holes into the elevator push/pull pivot bracket.  Reading the installation instructions it says the bolt heads must be on the inside but it did not say where the washers should be placed.  I found the clearance inside the bracket was very tight and it took several times of installing the bracket with various configurations before I found the right one that allowed free pivoting of the the elevator bracket.  I finished up the evening with the install of the cables but did not tighten them fully or install the safety wire (because I need to buy it still).


This weekend saw the most progress on getting things off the bench and onto the aircraft.  It really feels like an airplane now that I can manipulate the rudder with the rudder pedals and cables that I installed.  Next I'll install the rudder and elevator trim controls and cables and then move on to another system I haven't decided what yet.

Wednesday, November 23, 2011

Becoming a Stinsoneer

My brother Kevin and I are building an antique airplane that we hope to fly someday.  We got N97917 Stinson 108-1 built in 1946 from my cousin Mike and his wife Amy who had the airplane since the late 1970s.  This blog will cover our assembly and hopefully flight of this aircraft.  I always thought one day I would restore a classic car, I didn't think it would be a classic airplane but we are excited about this project and so are our families.

Here's a photo of it when it flew.  Mike's got his head poked under the cowling while his dad Uncle George in brown coat looks on.

Background History
I've always been interested in flying and took flying lessons when I was 15 at Palo Alto airport in an Aeronca Champ from Mr. Maynard Brown in 1974-75.  I used my paper route money to pay for the lessons and rode my bike out the the airport for each lesson.  I only got about 7-8 hours logged, but it was a blast.  When I find the photo of me and the plane I'll be sure to post it.  I ran out of money and then turned 16 and got to driving and football, dating, etc.  But I never forgot how much fun I had and always wanted to get my private pilot's license someday.  Kevin and I were always tinkering with machines when we were young and actually made our spending money by repairing friends cars in our parents driveway.  Kevin really liked aviation too and in the past years invited me, Dad, and my sons with his kids out to the Reno Air races each year for about the past 5 years.  We really liked going into the pits and checking out the aircraft on display.

Well, I read an article last year about LSA (light sport aircraft) and thought that might be a way to get back into the air for me.  Since Mike was the only pilot I knew, I called him and he said he wanted to get rid of his airplane.  Dad said he would help Kevin and I get it and volunteered an old garage behind his house we could use as a hangar.  First I had to modify the garage to become a hangar by adding an 8 foot extension to fit the fuselage into.  I also had to get electricity to the garage, fix the foundation, remove all the termite timbers, etc.  Finally, it was ready enough to move it over in early 2010 from the storage facility.

Here's the garage extension being built and using Dad's truck as a scaffold. Garage is older than our airplane.

N97917 in mini storage.

Kevin, Mike, and Dad moving one of the wings to put on the lumber rack of Dad's truck.

All secured ready for towing from it's storage in Milpitas, CA across the bay via back roads to our "hangar" in Palo Alto where we'll do the work.

Me and Mike moving it into "the hangar."

Safe in it's new home.

Early in 2010 Kevin and I started buying parts we knew we would need for the rebuild.  I took a sportair airplane fabric class which was great to teach me how to cover our bird.  We got a restored panel, radio, gauges, headliner, carpeting and a bunch of other parts from Stinsoneer John Baker.  Life got in the way until September 2011 when Kevin and I spent part of Labor Day touching up some rust spots on the frame (basically we repainted the frame with 2-part epoxy primer from Polyfiber).

Here's Kevin doing some of the painting with a hobby airbrush.  Hey, it worked and reduced most of the overspray.

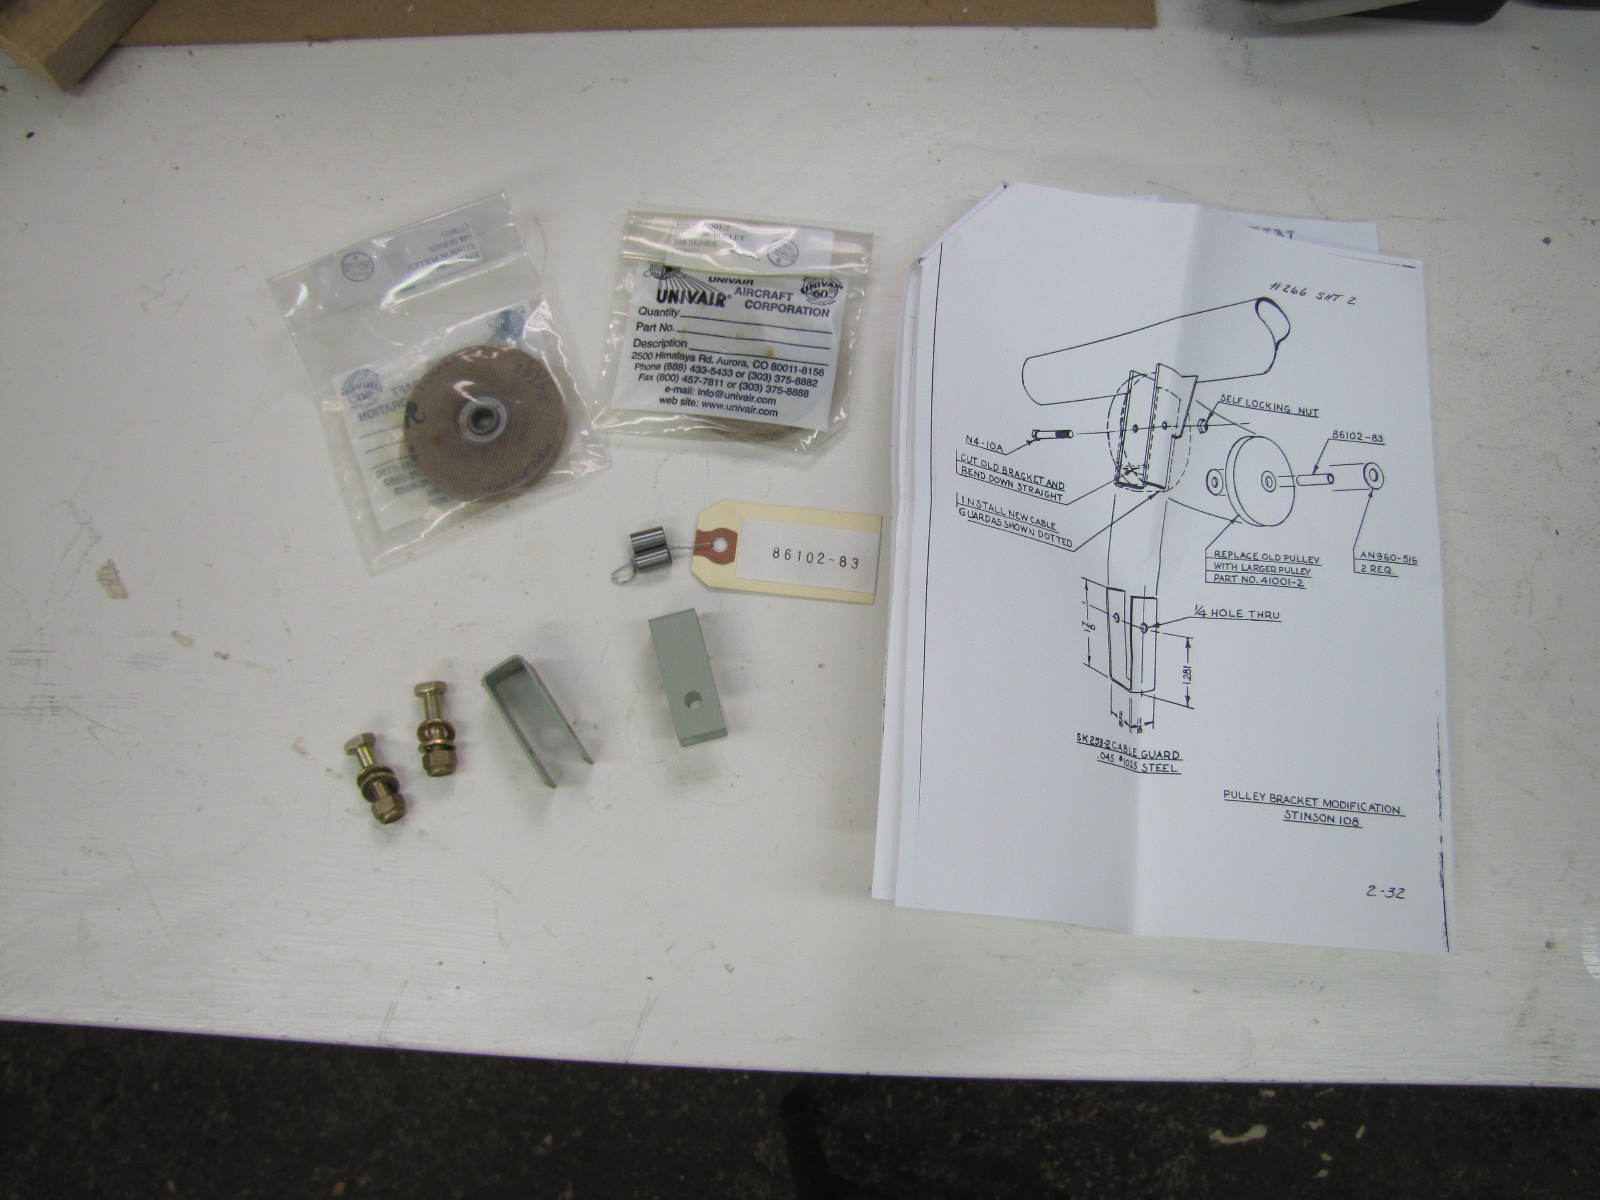
In October I got started on the rudder pedals.  There is no assembly manual and we basically got boxes of parts (some new, some old) and no instructions (they don't exist, I've checked) to put it back together. I've searched a lot online.  Read a lot online and looked at builds of other aircraft and thought the rudder pedals would be a logical place to start.  Mike had already bought new rudder pedals which allowed the co-pilot to be also able to apply the brakes.  I rummaged through all my boxes and found some new bearings (Fafnir KP5A) Mike got for the job. However, I found that they had to be modified by adding a sleeve to fit the AN4 aircraft bolt specified to hold the assembly together.  I asked around and fellow Stinsoneers said to use a piece of chromoloy 4130 steel tubing to make a sleeve which I did.  Here's what I did:

Here's a photo of the workshop in it's "finished" state.  We hope this structure will only be a temporary home and later torn down and a finer/bigger one built in it's place so we did what we could to get it fixed up.  BTW, before we even started on this project, we met with our IA (Inspection Authorization inspector)  who looked at our project, paperwork, and asked us some questions like if we knew what end of a wrench to use and gave us the OK to start work on our airplane.

Here's the 4130 steel tubing, the new Fafnir KP5A bearing.

Here's the bearing fitted onto the metal tubing which I had to file down and smooth down to the right OD using my drill to spin the tubing like a lathe.  Afterward, I also had to ream out the inside to fit the AN4 bolt specified to hold the bearing into the ends of the rudder pedal torque tubes.

Here's the new bearing on the left, the sleeve I made in the middle, and the old bearing on the right.  The old bearing would not spin at all.

Here's the rudder pedals installed.  Took me a while to figure out which one went in first and the end brackets were identical at first pass, but when it wouldn't fit and was hitting the other tube, I took them both off again and really examined them and found one was modified slightly to fit in the close tolerance.  It seems like some of the bolt heads in the tube or welded brackets still hit the other tube, but when the pedal is slightly flexed forward (when the brake cylinders are installed it should pull the top of the pedal slightly back and then the rudder pedal torque tubes operate freely--I hope).


Well, that's it for now. Long post, but this one had a lot of catching up to do.  This is my first blog and my first airplane I've restored so please be kind.  I look forward to sharing this adventure with you and appreciate your input and advice as you look over my shoulder on this adventure.