Monday, April 29, 2013

Flying Station Wagon Interior Panels

Our Stinson is a 108-1 called a "Voyager" model.  However, I really like the wood panels in the Flying Station Wagon models found in the 108-2 and 108-3.  Besides, I'm very comfortable building wood projects so that is why I chose to make ours like a Flying Station Wagon model without the reinforced floor.  My inspiration for these panels were woody cars from the 40's and 50's and I liked the contrast of the light colored trim and dark red paneling. 

With all the panels built, I moved right on to staining and finishing.  I am using Captain's Varnish from Petit that I got from a boat building supply company called Jamestown Distributors.  I used Red Mahogany filler paste stain on the mahogany plywood, but I have to mask off the light-colored poplar trim first.  Multiple coats of varnish have a nice amber warm color on the light poplar trim.  I have to sand the finish after each application which took an hour to sand and prep and another hour or so to varnish. During the one week I spent doing the last 5 panels I was able to put on a coat each day.  I first built a sample panel out of scrap and tested the finishes and stain on that.  Then I did two panels first which I learned a lot on.

First two panels stained with about 2 coats of varnish.
 My sample panel made from scratch with about 5 coats of varnish on it.  The depth and color are looking really good.

The previous panels didn't have any braces for the panels to attach to that I could find in my box of parts or photos of the dis-assembly so I researched others who had done wood side panels like in the 108-2 and 108-3 model Stinsons and saw that they use wood braces on the side walls in the rear cabin to attach to.  I got the dimensions of these braces from Dave Miller's Stinson page (his drawings were the start of these wood panels).  Below is a photo of one side I installed (did both sides).  I had to make the aluminum straps myself out of scrap aluminum because there was nothing I could find that did the job.  The Stinson "J" clips were not the right size for the tubing or did not have enough of a tab to screw something to it.  I made the braces/brackets out of spruce wood that I had.


Here are the remainder of all the panels that needed to be done.  My maskin- on these panels went much better with no bleed-throughs at the corners with the green frog tape.  In the door panel photo below, the top part of the panel with the slot on it will be covered with a vinyl piece.

Here's an interesting shot of a stain only rear side panel, and the opposite panel that has 3 coats of varnish.  You can clearly see that the varnish finish gives the light color wood a nice warm amber color and really makes the wood grain pop.  This panel still gets 2 more coats of varnish.

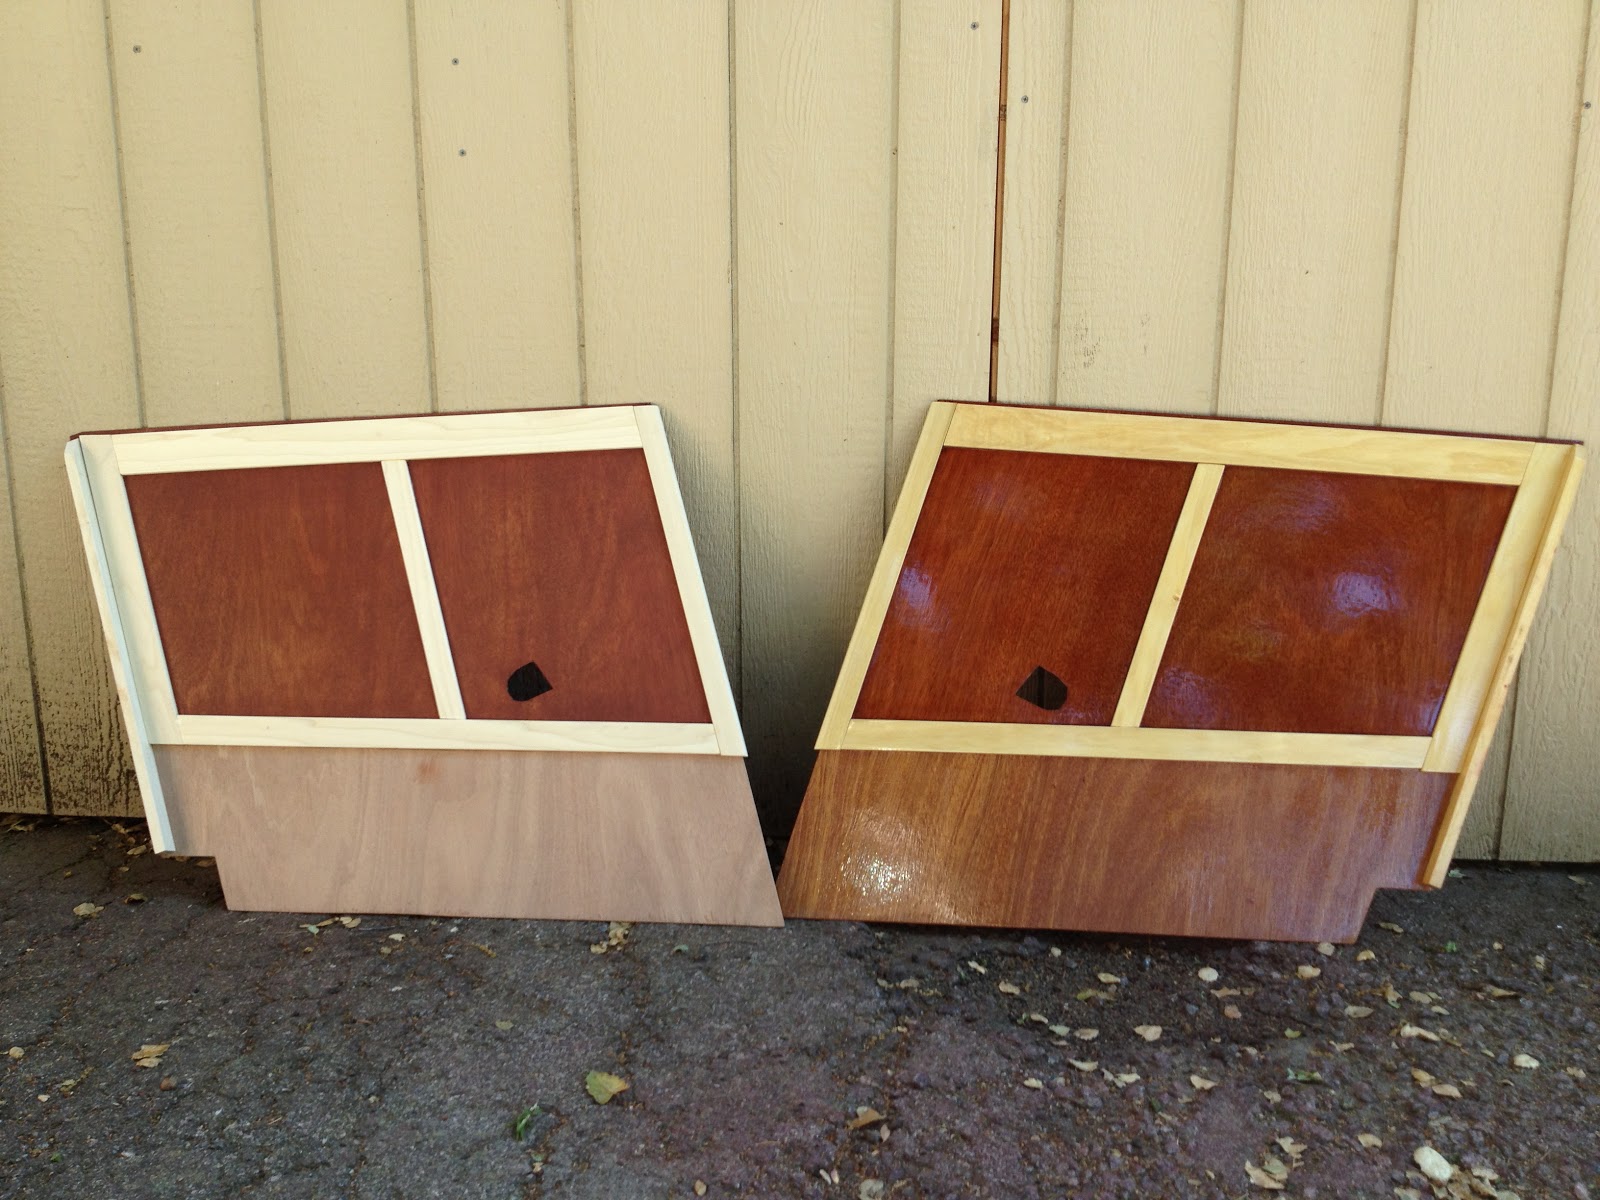
Here's a close up of the two surfaces.

Here's all the rest of the interior panels just stained.

These are the kick panels near the rudder pedals.  The part below the long light-colored trim will be covered with carpeting or I may have to trim this shorter and just use carpeting to connect to the floorboard sides up by the rudder pedals.

Here's the interior cabin panels finished.  They have 7 coats of Captain's varnish on poplar trim and luan mahogany 1/8" plywood stained with red mahogany paste filler stain.  The finish is not perfect--there are still some small imperfections and stuff in some of the finish.  I could polish these off later.  I put them on the airplane today to see how they all look.  I still need to make 2 triangular shaped panels for under the doors which will be covered with carpeting.  All bottom parts of the panels are also covered with carpeting. 

Note the reflection in the side panel of the back panel.  This is the mirror effect I was looking for as well as finish "depth".  The photos don't do it service, but in person they look really good.  I worry that the panel's finish will cause light to reflect around the cabin.  We'll see.  I have some hardware to start attaching the panels to the airframe and each other (the back is attached to both of the rear cabin side pieces).  I need to get some rivnuts and a rivnut tool to fit and attach the door panels to the doors.  I really can't finish attaching the door panels to the doors until the doors are painted with the finish coat. 

Spent 3.5 hours in the shop today installing the carpeting on the rear cabin panels.  See the below photos for the results which really look great.  Before I could begin, I had to coat the back of all the panels with a lacquer or clear coat.  Then I had to rivet on some aluminum channels to hold the top of the carpeting under the bottom light-colored trim.  This aluminum trim is shinny and is actually for installing vanity mirrors in bathrooms.  I got it from a glass company.  I used rivets to attach these channels.  Then I got the carpet roll out which we purchased with the rest of the cabin carpeting.  It is just over a yard.  I measured what we needed and estimated that we would have enough for the rear panels, side panels under the doors, and at the bottom of the kick panels by the rudder pedals.

The carpeting has a foam backer on it and for the carpeting to fit into the aluminum channel I had to remove about 3/4" foam strip for it to fit.  I did the rear panel first and found that totally spraying the  back of the carpet and then the area for it to stick to and THEN insert in the channel was nearly impossible.  Thereafter I first sprayed just the part of the carpet that goes into the channel and inserted it and held it in place until the adhesive dried and held, then I folded the carpet piece back and sprayed both, waited for it to tack-up and then rolled it together for a strong bond.  I also made a cardboard template of the carpeting I would need for the sides so I cut accurately.  Lastly I installed it all and it looks great.

In this photo you can see the template I made for the side panels, the 3M 77 adhesive, green utility blade, carpet and straight edge.


Side panel with bottom carpet without the adhesive on it yet.  Note the holes drilled for the side panel mounting hardware.  I think I will also add one more holding point near the door jamb, but I have to make an aluminum attach bracket for that so I don't drill into the fuselage frame door frame.


During the past week I applied 7 coats of varnish to all the interior wood panels including the doors and front kick panels (not shown).  I also cut and made panels for the carpeting to attach to under the door sills.  I also drilled and attached all the rear panels with stainless steel screws and finish washers. I screwed the hardware into "T" nuts on the wood braces I made.  I prepped the below photos by vacuuming up all the sawdust on the carpet and getting the stuff out of the plane so you can see the finished results.  It looks very impressive and conveys the "woody station wagon" feel I wanted.  I just have enough carpet to put on the bottom of the front kick panels.The white in the middle rear is the seat belt anchor which we will later paint with the red airplane paint along with the knee crossbar holders poking through the side wall panels.  This is just how I imagined I wanted it to look when I first thought I wanted wood "Station Wagon" interior panels.

I made a tab on one side that slips behind the rear side panel.  Both of these side panels under the door sill will be attached with at least one screw into a "J" clip to the frame.  There is actually a seam in the carpet you can't see between the rear cabin side panel and the small trapezoidal shaped piece under the door sill.  I made these seams very tight but they are actually 2 separate pieces of carpet and backing.

I trimmed the floor rear carpet to go around the battery box and I have dropped into place (not screwed down) the polished rear cabin heater vent grill on the floor.  I can't attach the wood panels on the back of the oleo strut cover until I paint it.  Notice the reflection of the grill in the side panel!  I also need to paint the fuselage support piece between the seats with the final red color.
 

I put one of the seat frames in place to see how it all looked and what would eventually be covered by the seat.

Nice view of the seat, battery box and heater vent grill.


Now I'm working on installing the headliner which already proves to be difficult.  I have to make a couple more wood pieces (1/2" x 1/2") for the headliner to staple to in the ceiling and rear cabin.  I have to work carefully here to get it to fit just right so I'm not rushing this part.

Monday, March 25, 2013

All wood cabin interior

Can't believe it's been two weeks already since my last post.  I got all my cabin interior panels built and have started on the finishing process.  Here's the details in photos and text.

Since I completed the rear cabin woody panels, I decided to continue them forward just like Dave Miller did on his Stinson rebuild where he documented and published drawings.  Unfortunately, Dave did not have drawings and measurements for the door panels, and I contacted him about it, but he is out of the country until April and I couldn't wait any longer.  With my confidence high on the results of the rear cabin panels I started on the co-pilot (right) side and moved forward.

Here is the passenger door panel cut to fit and the trim pieces cut and clamped. 

This photo shows that I finished the edges of the door panel the same as the edges of the rear cabin walls by wrapping the trim around the edge of the panel so it wouldn't be exposed and have a finished look.  This photo also shows that I relieved the backside of the plywood in several areas because of screws and such so that the plywood would be as flat as possible on the inside curve of the door.  I used the door itself as a clamp mold so that when the glue dried, the door panel would be curved and hold it's shape.

Here's the door panel clamped off for the night.  I used Gorilla wood glue this time instead so that I could wipe off with a damp rag the excess that squeezed out during clamping.  It seemed to work fine.  Before the glue up of this panel, I flipped it and traced it out with pencil on another piece of mahogany plywood for the pilot side door panel.


Here's the door panel all dried up and clamped in the door and mounted on the plane to see how the top trim lines up with the trim line from the rear cabin side wall.  Looks good I think.  The door handle will go right about in the center of the upper trim piece and the plywood above that will be covered by a piece of vinyl trim seen lying on the cabin floor carpet in the bottom of the photo.  These panels will look really different with the stain.

I laid the completed panel on the flat bench to show that it truly did dry curved in box X and Y directions to follow the shape of the door.

I also worked on the door panel sample and add a new coat of varnish each day and sanding in-between.  Hard to tell in the photo, but the grain is filling in nicely where I did the paste stain while the unstained right panel still has lots of low spots (?) where the varnish is trying to fill in the wood grain.   There is a slight color difference between the center and left panels that I did stain because I wiped the center panel before varnishing with a tack cloth damped with thinner that removed some of the stain.  I will not do that when I do the real panels.  I am glad I made this sample/practice panel to learn the limits of the staining finishing process.


Before I could tackle the pilot side door, I had to take it apart first.  Here's the pilot door handle and the old interior panel on the door.  The escutcheon around the door handle is kind of rusty and I'll have to see if we can get a newer one eventually and I'll polish up the handles like I did on the co-pilot side.  Dave Miller who designed and posted the how-to on the cabin interior panels who said he had a friend do a 108-1 like ours and the door handles and locks had to be specially relieved.  I will eventually experiment on the test panel I made to how it/if it will work.


Here's the side panel, door panel, and kick panel all in place.  I like the look and this will work and look really good on our airplane when it's all done.


Here's a close-up of the  joint between the kick panel and the door hinge side.  You can see that I wrapped the light-colored trim around the plywood panels.


Satisfied with my test panel finishing so far, I decided to start taping off a couple of panels.  The green tape is frog tape that comes in it's own plastic storage container to prevent it from humidity exposure.  Apparently, the tape absorbs moisture which then helps it make a cleaner line on the item you are painting.  Normally, this happens when using latex based paint, but since we're using oil and solvent based stains and finishes, I wiped a damp rag around each panel and trim taped are so that it would seal before I started staining.


Here's a panel with the first coat of the stain paste filler on it.  I need to wipe off the excess paste so the grain is exposed.  Not bothering to stain the lower part of the panel because it will be covered by carpeting there.

Here I'm putting on the second coat of stain paste filler the next day after reading as much as I can about this product and how stain paste filler videos on Youtube.  You can see that the left panel still needs more wiping.  At the top left of the photo is an old plastic credit card as a squeegee which I squeegee 90 degrees to the grain right after I apply the product, then a paper cup and stir stick and application rag, some red rags, flat razor blade cutter (to cut rags into smaller pieces), the thinner from Petit for the stain paste filler and the Captain's Varnish, a burlap piece to scrape off excess paste filler and work it into the grain more, putty knife for hard to get corners, and my right-hand glove I had to take off to get my iPhone out to take a photo.

Here is one of the panels 24 hours after the second coat.  Most of the mahogany grain is now filled and will be easier to get a smoother, mirror like, finish with the varnish.  I really like the color contrast of the trim wood and the red stained mahogany.  This will get more golden colored with the application of the varnish.

 Close up of the poplar trim and the mahogany.  Pretty nice clean line from the masking.

 The frog tape worked great but there was a couple of areas the stain leaked onto the trim wood.  I will need to see if I can bleach this out or sand it down to diminish it.  This is the worst stain leak from the my masking.


 So far it looks pretty spectacular.  I'm waiting for a badger hair brush I ordered that will make the varnish process better and get the bubbles out of the varnish when I apply it.  I can put the first coats of varnish down tomorrow with foam brushes that I purchased for this project.  Note the old Terra portable aircraft radio on the bench I got with the project.  I have it plugged in and listen to it in the background.  I have it tuned to Palo Alto (PAO) tower frequency and hear all the activity which is about 1 mile from here.  At the same time I can hear many planes fly overhead as they depart or enter the pattern over Palo Alto.

Saturday, March 9, 2013

Cabin woody panels and more

Steady working on the Stinson lately and getting a lot done.   I installed the first cabin heating ducts using SCAT tubing and the aluminum 2" diameter tubing, the long one which I painted in my recent post.  With 2" OD aluminum tubing and 2" ID SCAT tubing, it is tough to get attached, but I did it and clamped it with hose clamps.


I made these little kick panels for the back of the oleo strut cover.  Cannot attach them yet until I finish paint the oleo strut cover.  Need to do a small aluminum patch job on a spot Mike cut to install the tow hook handle system.


Next I started working on the rear cabin wood panels.  Even though our Stinson 108-1 is a Voyager model, I really like the wood interior siding of the Flying Station Wagon model so that is what I am making.  I am using the woody panel drawings from Dave Miller who posted them on his Stinson website.  I am making them out of 1/8" thick mahogany plywood paneling and 1/4" thick poplar.  First I check of rear cabin woody panel cut to size and with pencil markings for where trim goes. 

Rear cabin woody panel with trim pieces rough cut to size.  Have to cut these outside on table saw and chop saw to rough size during the day, and then can do finish cuts in the evening inside the shop.  I think it looks terrific!  I am going to attach with T-88 epoxy adhesive since these materials are so thin it doesn't leave much room to mechanically join them together.  T-88 is a structural adhesive which should give plenty of hold.  Besides, the hardware screwing these to the frame will hold it all together anyway.  My goal is to apply a varnish material made for wooden boats by brush or spray for a high gloss transparent, smooth finish that will be unbelievable.  


To set up the adhesive, I used some weights, bricks, paint cans and an aircraft repair book to hold down the trim while it sets up.  I leave it in the "press" for about 24 hours.


Dave Miller's rear cabin side panel dimensions is where I started, but found there were a few different dimensions.  I like having a template too, so I made one from cardboard using photos for reference.  Then I cut out the mahogany panels, check fit them, draw the trim on the panels and start to use my table saw and chop saw to cut the trim to fit.  I used T-88 adhesive for the trim except this piece on the back of the side panels that acts as an attach surface for the rear panel.  I used wood glue and air stapler for that piece.


For the trim piece next to the door frame, I was not sure how to make this piece until I remember a ramp queen 108-2 we found in Payette, ID when we were there in May of 2011 for a family reunion.  It was unlocked and I used the opportunity to take some photos.  It had woody panels and I happened to take a photo of the leading edge near the door frame so I found my answer in my own photo collection of Stinson 108s.   I bought a thicker piece of poplar and ripped it down to 3/8" thick and ripped a 1/8" thick part out of it to fit or wrap around the end of the plywood.  I also used a router to make a nice round edge.  Another note on special pieces, the middle vertical trim pieces I planed down to 3/6" thickness according to the original design.  Before glueing I sanded off blade burns and spots with 150 grit and then 220 grit sandpaper.


In one hour's work, I made the hardware attach points for the control column cover in the front floorboards using flat tinnerman nuts and rivets.  I also attached the small wooden pieces to the firewall frame that the front of the cover attaches to also.

I also got a lens cover for the cabin ceiling light from Mike Benoit.  It fit perfect right out of the box.  Thanks, Mike.


With the rear cabin walls, I couldn't resist trying out a rear seat sling.  I got out one of the old seats and set it up to see how it looked and felt.  I will use these as samples to make new ones.  This sling seat is comfortable (my first time sitting in the back seat of any Stinson 108).  


I am anxious to install the headliner soon so I got out the old one and removed the aluminum bows from it and really got out the headliner I got from John Baker when he parted out his 108-3.  I decided to dry-fit the headliner.  Even though it is written on it for a 108-3, it seems to fit pretty good.  A couple of the sleeves the aluminum tubing goes through are too long (longer than the aluminum tubes) so I don't know the difference between a -3 and a -1 or -2 headliner (if any).   I had it clamped at the front to hold it up.  I still need a couple more pieces of wood trim to attach the headliner to above the door, install the shoulder harness brackets, and install the windshield wooden brackets.  I'm not sure what kind of staples to use and I am studying the Yahoo Stinson group and Int'l Stinson club websites for clues how to attach the headliner.  


The old headliner.


I have more hardware and wood on order from Aircraft Spruce.  I also have some varnish, stain, and thinner designed for wooden boats coming which I will use on the woody panels to make them a mirror finish and stain the mahogany a little redder to go with the color scheme of the airplane.  I need to get more paneling and poplar trim to do the doors and maybe the kick panels near the instrument panel.