It's been too long since my last post. I got laid off work at the end of the summer which kind of dampens the mood to work on something fun. Besides, I spend most of my time looking for a new job and catching up on other projects that need completion.
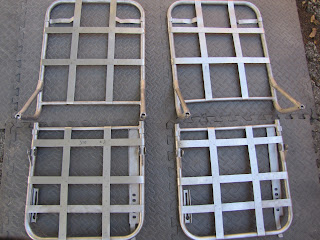
From an earlier post I used my blasting box and bead blaster to clean up the front seat frames and found some of the straps were broken or cracked. I knew I needed to get these seat frames completed because they were starting to get surface rust. I got some 1" wide, .025 thick 4130 chromoly steel from Aircraft Spruce and found a local metal shop who could do some spot welding. They only had the project for a day and called me back the next day to say they were finished. They had a lot of fun doing the project. They spot welded the straps doubled up on the existing straps and Tig welded the ends of the straps which I had them wrap around the frame.
I used Rustoleum primer and paint to coat them. I didn't think I needed to apply aircraft paint since 95% of these seat frames would be hidden inside the seat cushions. I also painted the front seat frame rear legs (the front part of the seats rest on the frame over the oleo strut cover where the landing gear shock absorbers are). Here's some of the photos of the painting:
I think these turned out very nicely. Shame to cover them. This new welding will last another 60 years or so and hold our large Ganschow frames (over 6 feet and some of us pushing 250 lbs).
I got new hardware for the seats. One of the old seats was held together at the seat back hinge area with a 6 penny nail! I got new clevis pins and used cowling safety pins to hold the clevis pins the same as what I removed. I searched online and in the Stinson parts manual for the correct type of hardware, but there was no reference to be found so I used new AN hardware to install the seats in the plane for the first time since it was dis-assembled over 32 years ago.
Cabin width at the shoulders is 36.5" so it'll be cozy inside with the doors on.
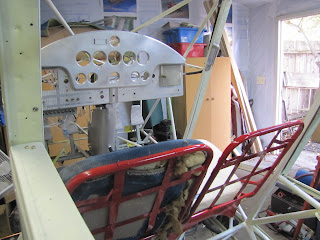
I had to put the old seat cushions on and sit in it to see how far my head is from where the headliner would be. I'm looking at a couple of aircraft foam suppliers including one called Hi-Tech Foams from Wisconsin I think. The foam seats are about 3" thick and will compress about half when sat on (maybe more when I sit in the seat). Actually, the old seat cushions and the new seats felt fairly comfortable. I was thinking about adding lumbar support and some thigh support into the seat cushion design, but maybe I'll keep the original seat cushion shapes like in the photo below. Note that the original seat fabric in blue is on the seatback and the black is a seat cover that was installed over the worn out seat fabric.
Sitting in the airplane for the first time without a floorboard but with my feet on the rudder pedals was a real thrill. I didn't make any engine noises and didn't have the yoke installed, but I could imagine looking outside at the landscapes we will someday fly over. It seemed kind of bare with just the frame around me, so I installed a restored panel I purchased from John Baker that you can see on his Hangar9 website. I got some stainless steel 8-32 screws and lock nuts with my seat hardware order to install the instrument panel. NOW it felt like an airplane even with the blank instrument holes staring at me. I wanted to see how my legs would clear the custom-made breaker sub panel on the bottom of the panel John Baker made. I had no problem working the pedals or with my feet flat on the floor.
Did I mention that John Baker's panel also included all the wiring harnesses? It won't take long for us to sort them out and hook them up. I should soon get my rebuilt tach and airspeed instruments back from Keystone Instruments which I sent in to them in April 2011.
Next up is to build a small paint booth complete with lighting and fan exhaust for small parts I need to paint for parts I have ready to install. Mostly I need to recover the Stinson "J" clips that I bead blasted in the spring. Need to paint them before they rust up again. Thanks for sticking with the blog and hope to add more updates soon.
Tailwinds,
Don G.


Hi Don
ReplyDeleteFantastic Blog. My name is Tony Wrobel
I am really interested in what you are doing. I am currently researching the purchase of a 108-2 but want to do it as a project and sup it up a bit with a bigger engine and upgraded instrument panel.
I am ex Australian Airforce now working in Hong Kong flying the Airbus.
I am planning to go back to Australia at the end of 2013 and want to kick the project off soon after. I am either looking to purchase in the US and restore or purchase one in Oz and restore or a combination of both.
I have a clear picture in my mind what I want and have read all of the info available on the different sites and have recently joined the Yahoo Stinson group.
I would like to get some info from you from time to time if that is alright and I promise I won't bother you to much.
For now what I would like to know is how much room is there behind the instrument panel with respect to the elevator control when full back stick is applied. I'm hoping it's more than 11 inches
Also can you describe the false instrument panel a little or send me some close up photos of it so i can figure out how this mounts.
I am gong to get a new panel made but given the layers of panelling I just want to understand this better when designing the layout.
My email is tonysharonw@gmail.com
Thanks for your time and happy landings
Cheers
Tony